🚀 Don't let a flat tire ruin your adventure!
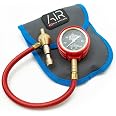
The ARB 10000011 Speedy Seal 2 is a comprehensive heavy-duty tire repair kit designed for a variety of vehicles including cars, trucks, RVs, and motorcycles. It features a premium set of tools including a spring steel insertion needle, hardened steel reamer, and 40 vulcanizing repair cords, all housed in a durable, compact case for easy transport. Ideal for emergency repairs, this kit ensures you're always prepared for the unexpected on your journeys.


| Manufacturer | ARB |
| Brand | ARB |
| Model | 10000011 |
| Item Weight | 2.3 pounds |
| Product Dimensions | 13 x 8 x 2.5 inches |
| Item model number | 10000011 |
| Is Discontinued By Manufacturer | No |
| Manufacturer Part Number | 10000011 |
| Voltage | 12 Volts |
B**P
MADE IN CHINA
Unfortunately, as with most merchandise, the ARB 10000011 Speedy Seal 2 is Made ("manufactured") in China, but in accordance with the design specs by the Australian company. The manufacturing origin is shown on the cardboard sleeve cover for the tool case.This review is given prior to use of the tools. However, this is not my first time to "plug" a leaky tire - in this case a screw puncture. With that in mind, having used plugging tools in the past, the ARB 10000011 Speedy Seal 2 is definitely good quality with weight, irrespective of the manufacturing origin. The tools are not "junk."One thing I would point out is to CHECK the torque on the Allen Set Screws before use, particularly for the plug "insertion needle." Mine were slightly loose when delivered, which is fine since this is a good manufacturing/assembly protocol.One tip for anyone who has never plugged a tire: If you have access to an electric (or cordless) drill, remove the handle on the "reamer" tool and set it firmly in your drill. Use a slow drill speed and work the reamer in and out of the puncture hole a few times to make a clean, round hole. Also follow the angle of the puncture whether it is a "straight-in" puncture or at an "angle." This makes the job much easier.Another tip: It's not so much the tools that determine the success of the plugging. There are two parts to a successful "plugging." First, good tools and good adhesive/plugs. Those are the two components.Some plugs come with the adhesive on the plugs. Rather than using the "lube" with the kit for the "insertion needle," I prefer applying adhesive on the tip of the insertion need and on both sides of the plugs (full length) after threading the plug into insertion "eyelet" needle. This will act as the 'lube' and also will give additional adhesion.I ordered (separately) the "Western Weld" clear vulcanizing adhesive (Made in the USA) to use with the plugs, I have used this with 'plugging' projects in the past. It does what it's suppose to do; hence, the "Weld" in it's name.One last tip: Apply the adhesive liberally to the puncture hole entry before inserting the plug. When inserting the "insertion needle" to plug the puncture, go straight into the puncture all the way to where the sleeve on the shaft is firmly against the tire tread and flush against the handle - then rotate the handle one-quarter (1/4) turn and then remove the insertion needle. After removal leave about 1/4" - 1/2" of excess plug sticking out from the plugged puncture hole. Air up the tire to recommended tire (PSI) pressure. Apply more adhesive on the plugged hole. Let the tire set for about an hour to allow the adhesive to dry. Then use a soap/water (sudsy) mixture to check for air leaks. No leaks... Then you are good to go.Finally... Check the tire pressure on the vehicle every one or two days for about a week or two. In my experience I have never had a tire to leak. That is just my own personal experience.Hope this helps...
L**E
Outstanding Kit!!
The BEST kit I have seen on the market- highly recommend!!
F**S
Rambo's tire repair kit
I won't rehash all the glowing reviews about this sets' superior construction and content. I will say that both its handles survived multiple whacks with a drive hammer and survived. It is billed as a "4x4" repair kit for off road tires, but will also work quite well on passenger car tires.So here's my experience with a few pointers to make things easier.First after you gather all the tools, lube, cement (more on this later), pre-thread the rope plug through the needle, making sure you have 2 even length plug 'legs' bent upwards towards the handle. Locate the puncture, pre-lube the reamer and have at it per the instructions. You really will have to twist and drive the reamer past the tread belts. Although you can repair a tire on the car, you need so much leverage to drive the reamer, (and the plug needle) through the tread and tread belts, it will be difficult. I would estimate 50-75lbs of arm pressure is needed to push through. The tougher the tire (i.e. LT type tires with a lot of tread), the more you will have to push. Here's tip # 1; take advantage of the removable handle on the reamer (hex key supplied with kit), and attach just the tool shaft to your electric drill--instant ream job! Just don't overdo it!Now that you've rounded and trimmed off the puncture all the way through the tread, cord, and belts, use the reamer as a 'plug' to stop any additional air from escaping. Things go better with air pressure in the tire since it supports the tread around the 'target area', so don't let the whoosh of escaping air rattle you.Next, remove the reamer. Air will escape, but if you have about 20-25 PSI of air pressure left in the tire, you will have plenty of time to grab your loaded plug needle and put it in the hole. My first repair was rear tire on a sports car. Very limited working space=very little leverage. I could not drive home the plug. Tip #2. The solution was to coat the plug and needle with rubber cement(purchase separately as it is not supplied)(disclaimer: I think this was mentioned in a previous review-thanks). The cement acted as a lubricant, and while still difficult, I finally was able to drive the plug home. In my case, the kit-supplied lube was ineffective. It probably would have been different if I removed the tire however.Note: This is an "open eyelet" kit. The plug 'needle' has a open slot to facilitate its removal from the tire whilst leaving the plug in place. DO NOT rotate the needle when driving the plug into the puncture. You risk spreading/breaking the eyelet off the needle shank within the tire, or jamming up the eyelet with the twisted plug.Feel free to drive the plug all the way into the tire until the sliding cone stops your motion. NO fear of going too far. Put pressure on the sliding cone, holding it against the tire, while pulling the needle out. The plug is now perfectly seated in the puncture. Just trim the leftover exposed nub with a blade, leaving about 1/8" excess above the tread, so it can be further seated by the rolling tire.One final point, you really need to carry, or have access to, an air compressor or air pump to re-inflate your repaired tire. Otherwise driving on a severely under inflated tire is inviting a blow out.Like everything else, this kit has it's limitations. It probably won't work if you have impaled a railroad spike as you cannot 'double up' the plugs. Also, side wall repair is out-too much flexing. Same with angled punctures. However, when done properly, the self vulcanizing plugs should last the remaining life of the tire. Happy plugging!
Trustpilot
2 days ago
3 weeks ago